
Diy Taser

Pin On Survival Skils

Pin On Battery Power
Pin On Survived

Pin On Survival

Pin On Powerful Stun Gun Taser

Pin On Electronic

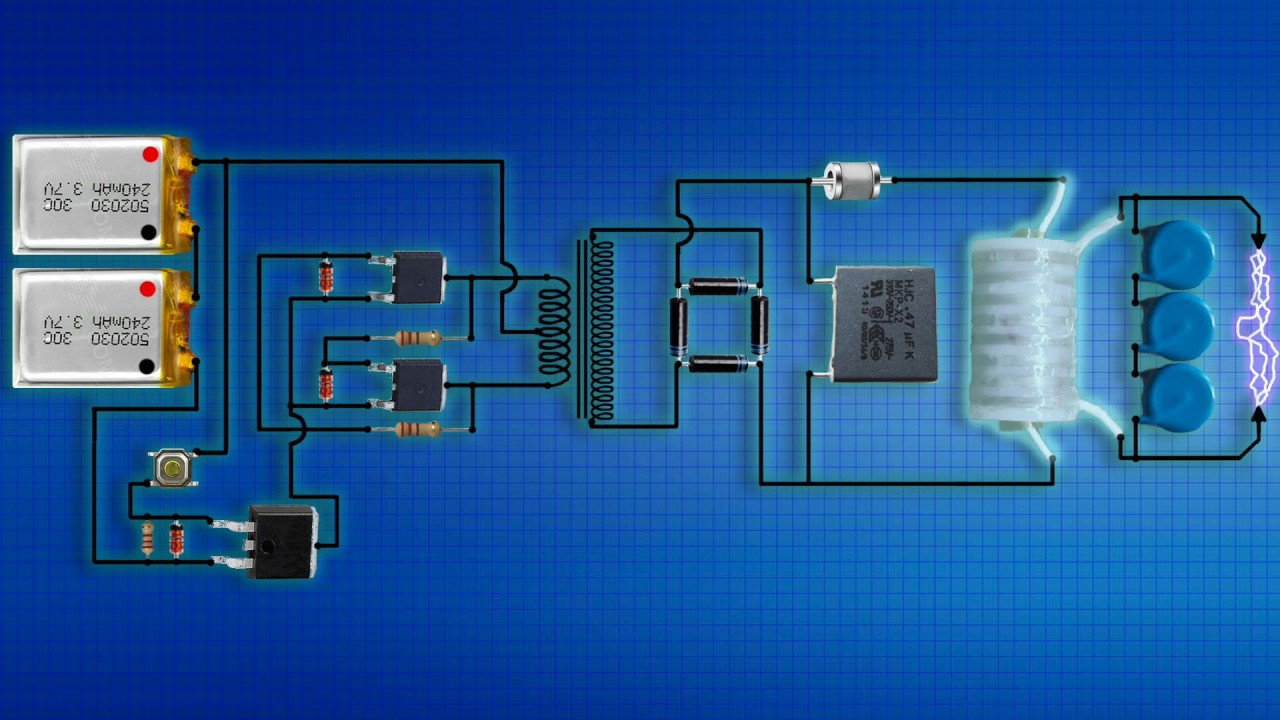
Step 2 Line up your Batteries.
Diy taser. A Taser also known as Stun Gun is one non-lethal electric shock producing unit used to paralyze a person for a time being without causing any severe damage or injury. Hold the taser so that the contacts are facing away from your body. Once youve done that experiment you have a decent taser.
DIY Taser Gun Circuit Stun Gun Circuit Last Updated on November 22 2021 by Swagatam 33 Comments A Taser circuit also known as Stun Gun circuit is one non-lethal electric shock producing unit used to paralyze a person for a time being without causing any severe damage or injury. We live in a society where crime-rate is increasing day by dayIt is not possible to carry a knife or other self defense weapons everywhere at all the time. In this step place the foil on the surface you are working on and just make sure the foil is flat.
A taser is designed to provide arelatively slow series of very high voltage and current short-period pulses. Remove the flash bulb. Here we are building this Stun Gun circuit on PCB.
Buy a better Lithium-Ion Battery for longer and better use of. I installed a piece of flat plastic that held the wires about 3cm away from the module and kept the user safe from electrocution. 1 connects to the positive side of the small capacitor and 6 connects to the negative side.
The stun also known as taser can paralyze the attacker with paralyzing electric shock. So here is how you can build your own Electric Taser. DIY Taser Gun Circuit.
The average power isverylow as to not kill the victim and the pulses are very short to prevent burning. For a potato gun I guess all you really need is a rather fat spark to ignite the propellent. Stretch the two cables so they are facing away from the button of the black container you extracted from the lighter.
How To Make A Taser Taser Electronics Projects Diy Electronics Projects

Pin On Ritesh

Pin On Electronics

Pin On Proyectos

Pin On Lugares Para Visitar

How To Make A 20000 Volt Taser From A Bug Zapper High Power Youtube Electronic Circuit Projects Taser Electronics Projects Diy

Pin On Saved

Pin On Taser

Pin On Diy S

9 Volt Secret Taser Taser 9 Volt Battery Secret

Pin On Stuff

Pin On Screenshots

Pin On Survuval Eeuipment
